Setup and process for intercompany trade in Microsoft Dynamics AX 2012 R3


Dynamics AX 2012 R3 allows for the capability to handle intercompany trade transactions. Intercompany trade transactions allow organizations to sell products and services to other business units or legal entities within the organization for fulfillment of a customer order.

This blog will outline the setup and process of creating a sales order for an external customer with the help of intercompany trade process.

For example, we have an organization with two legal entities, GCCI and USMF. GCCI receives the order from a customer, but does not have inventory to fulfill order. Therefore, USMF will fulfill the order with their inventory and deliver directly to the customer on behalf of GCCI. For this to occur, GCCI will use the intercompany trade transactions process.

The first step is to create a vendor in GCCI in the USMF entity. A new vendor can be create by navigating to Accounts payable > Common > Vendors > All Vendors.

Next, let’s create a customer record in USMF for the GCCI intercompany customer. To create a new customer, navigate to Accounts receivable > Common > Customers > All Customers.

Once the customer record has been created, open the customer record and open the miscellaneous Fast Tab. Then check the create intercompany orders option.

Then go to the general tab in the action pane and select Intercompany.Dynamics AX 2012 R3 Intercompany Trade 3

Once in the intercompany menu, check Active to setup trading relationship. Under Purchase relation, select the vendor company and specify the intercompany vendor record created in GCCI.

In the purchase order policies tab, a set of options will be available for a user to select. These options dictate how the intercompany purchase orders and intercompany sales orders will behave. To fully understand the various options available for intercompany trade relation setup, refer to this TechNet article: Set up intercompany trade [AX 2012]. In this example, Post invoice automatically under Original sales order (direct delivery) and Post invoice automatically  under Intercompany purchase order (direct delivery) are checked.Dynamics AX 2012 R3 Intercompany Trade 4

In the sales order policies tab, the intercompany sales order tab lists options that dictate how the intercompany sales will function. In our example, the sales order numbering and customer payment journal is specifiedDynamics AX 2012 R3 Intercompany Trade 5

Once the trading relationship setup is completed, close the intercompany form and go to the GCCI company to begin creating the intercompany sales order. Keep in mind that after the intercompany trade setup is activated, the intercompany vendor account in GCCI will be automatically setup. To process an intercompany sales order, navigate in the GCCI entity to Accounts receivable > Common > Sales orders > All sales orders. Create new sales order and specify the customer for which the order will be fulfilled. Then proceed to fill the necessary information like item, quantity, site and warehouse, and etc. After the sales order is filled, select Header view in the action pane.Dynamics AX 2012 R3 Intercompany Trade 6

In the intercompany FastTab, check the Autocreate intercompany orders’ and Direct delivery options.Dynamics AX 2012 R3 Intercompany Trade 7

Then in the action pane, select Direct delivery. Specify the intercompany vendor account and then flag the Include flag. Then select OK.Dynamics AX 2012 R3 Intercompany Trade 8

An infolog will then appear indicating that a purchase order and an intercompany sales order have been created. Then close the sales order form.Dynamics AX 2012 R3 Intercompany Trade 9

Now the user will go to the USMF entity and navigate to Accounts receivable > Common > Sales orders > All sales orders. Locate the sales order that corresponds to the sales order created in GCCI. In this example, the intercompany sales order can be identified by number sequence.Dynamics AX 2012 R3 Intercompany Trade 10

Open the sales order and process the order as normal. At the end of the process, the sales order should show the status as Invoiced.Dynamics AX 2012 R3 Intercompany Trade 11

After successfully invoicing the sales order in USMF, go to the GCCI company and navigate to the intercompany purchase order. It can be noticed that the purchase order was invoiced automatically. Keep in mind that the status of the purchase order will appear as invoiced because we had set the option in the intercompany relation setup.Dynamics AX 2012 R3 Intercompany Trade 12

Navigating to the original sales order, you’ll notice that the status of that order will also show as Invoiced. Upon completion of the transaction, users can make and receive payments by using the AP and AR payment journals.Dynamics AX 2012 R3 Intercompany Trade 13


Task recorder – Basic mode

This article describe how to use the new version of the tax recorder in Dynamics AX 2012 in basic mode.

The task recorder has two modes:

  • Basic mode: This mode generates a Word document and a video recording of the selected business processes in a predefined shared folder.
  • Advanced mode: Use this mode to record, upload, and share your business processes to Business process modeler in Lifecycle Services for Microsoft Dynamics AX. Advanced mode can generate a package file that can be uploaded to Business process modeler. The package file contains hierarchy, process, and Application Object Tree (AOT) metadata, and also task documents and videos.

Access to task recorder tool: File > Tools > Task recorder

Setup

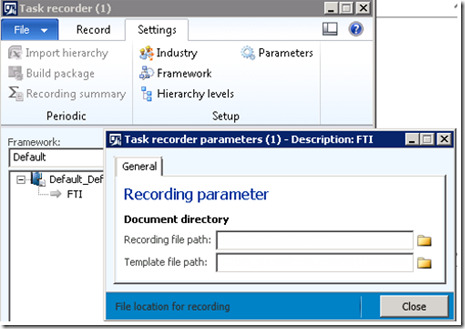
Go to Settings > Parameters

  • Select the file path for recording the documents generated
  • Select the Template to use for the word documents

image

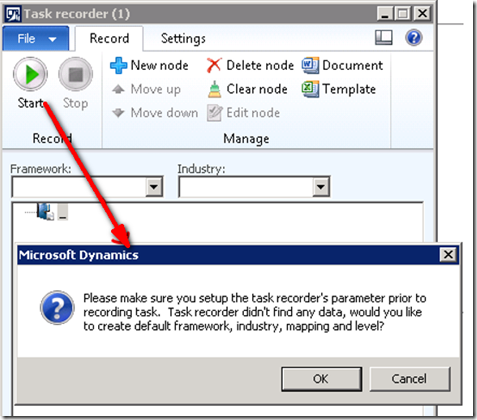
When you use the task recorder in the basic mode, the setup can be done per default the first time you click on “Start”:

image

Use task recorder

Step 1: Create a node

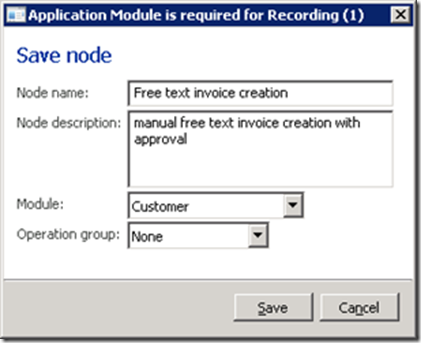
  • Click “New node”
  • Enter a name, a description
  • Select a module

image

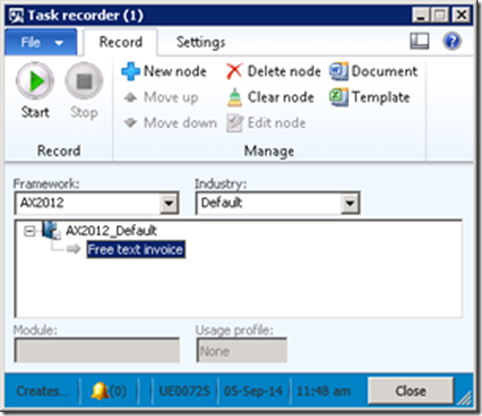
  • New node is created: you can use the nodes to order the task recorder and one node is link to the documents created

image

Step 2: prepare to record

  • Be sure that you know all of the steps in the tasks that you plan to perform, and that you have prepared the environment so that you can perform all of the steps.
  • Be ready to perform the task relatively slowly. If you move too quickly, for example if you spend less than one second on a form, Microsoft Dynamics AX may not be able to take a screen shot of the form.
  • Be prepared to record the task more than one time. Task recorder may not record all of the screen shots that you want, or you may want to add more steps.
  • Record should take less than 10min

Step 3: Record

  • Select the node
  • Click Start
  • Run all your actions in AX
  • Click Stop when finish

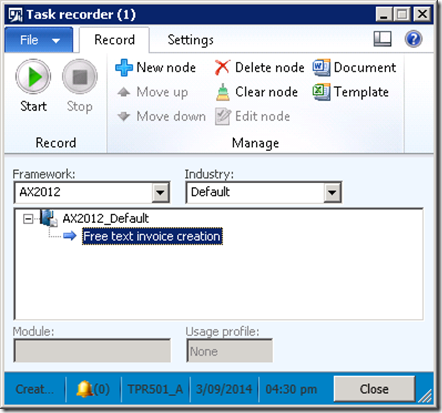
Once the recording is stopped, a word document and a video file will be created. In the task recorder, the little arrow become blue

image


Remove a document

If you want to delete the document:

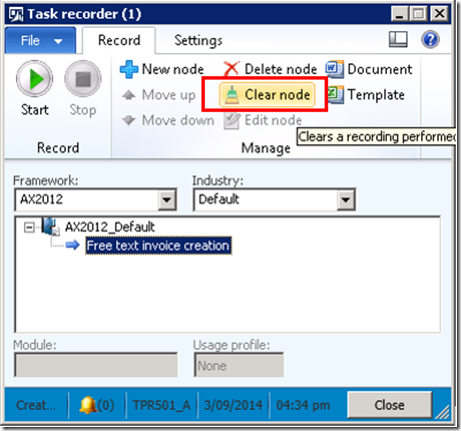
  • Select the node and click: Clear node
  • You can click Start to record again or delete the node

image

Sales tax setup

This article describes how to setup sales tax in Dynamics AX2012

1/ Introduction

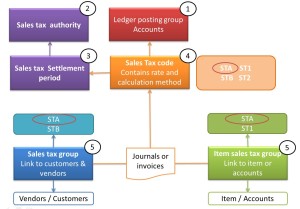
In Dynamics AX, there are several elements to create for the sales tax functionality:

  • Ledger posting group: this element contains all ledger accounts.
  • Sales tax code: this element contains the sale tax rate and the calculation method (rounding).
  • Sales tax group: this element is the link between the sales tax code and customer/vendor.
  • Item sales tax group: this element is the link between the sales tax code and the item.
  • Sales tax settlement period: this element contains the period of payment of the sales tax.
  • Sales tax authority: this element is linked to the settlement period. It can be linked to a vendor to automize the payment.

To setup the sales tax, you must follow the order below:

SalesTaxGL001

2/ Step 1: Ledger posting group

Access: General Ledger > Setup > Sales tax > Ledger posting groups

  • Click new to create a new ledger posting group.
  • In the field “ledger posting group”: enter a unique code.
  • In the field “description”: enter a description.
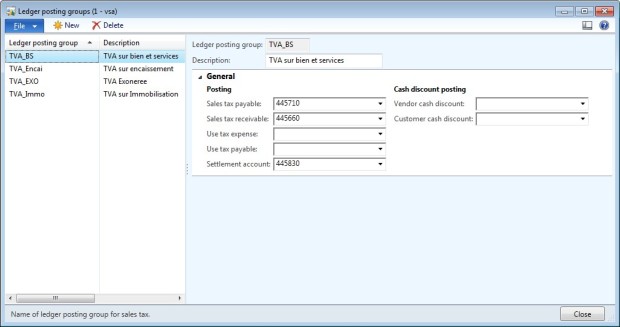
  • On the General tab, enter the ledger account to use.

SalesTaxGL002

Description of the accounts:

  • Sales tax payable: account use in a customer invoice. It is the sale tax to pay at the authority.
  • Sales tax recevable: account use in a vendor invoice. it is the tax deductible.
  • Use tax expense: account use when the sales tax is due on a payment and not on the customer invoice.
  • Use tax payable: account use when the sales tax is due on a payment and not on the vendor invoice.
  • Settlement account: account use for the payment of the tax.
  • Vendor cash discount: account number of cash discount payable.
  • Customer cash discount: account number of cash discount granted.

3/ Step 2: Sales tax authority

Access: General Ledger > Setup > Sales tax > Sales tax authorities

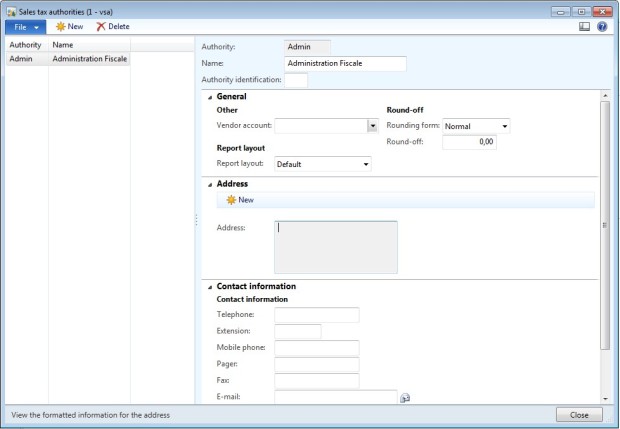
  • Click new to create a new sales tax authority. You must created one at least.
  • Enter a code in the “Authority” field
  • Enter a name/description in the “Name” field.
  • You can link the authority to a vendor account.

SalesTaxGL003

4/ Step 3: Sales tax settlement period

Access: General Ledger > Setup > Sales tax > Sales tax settlement periods

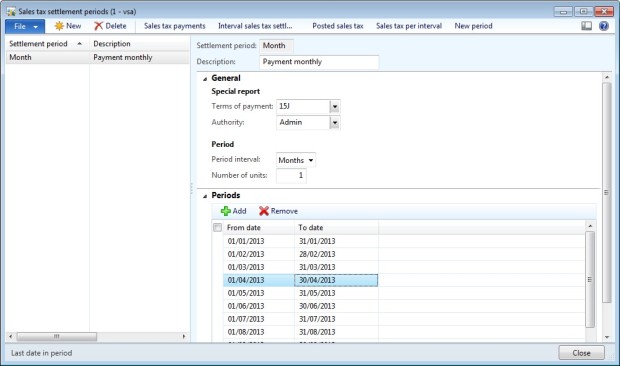
  • Click new to create a new sales tax settlement period.
  • Enter a code in the “Settlement period” field
  • Enter a description
  • Select a Terms of payment (link to the AP>Setup>Payment>Terms of payment screen)
  • Select the authority created in the preceding step.
  • Choose you period interval and the number of units: Months/1 for a monthly payment, Months/3 for a payment every quarter…
  • Create the first single period (select from date and to date) and click on “New period” button in the top of the screen to create the next periods.

SalesTaxGL004

Remark : add the last step in the task list of the end of year to create all the single periods of the new year.

5/ Step 4: Sales tax codes

Access: General Ledger > Setup > Sales tax > Sales tax codes

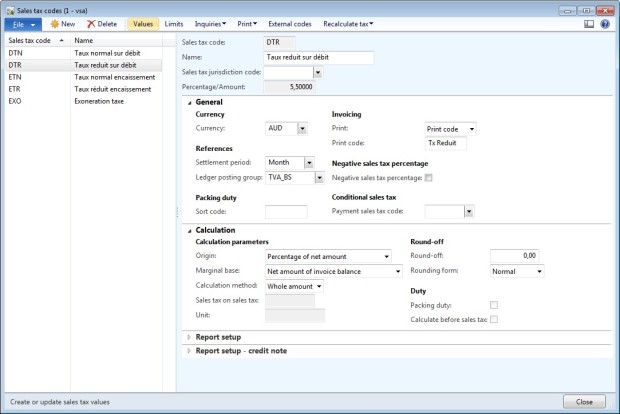
  • Click on New to create a new sales tax code
  • Enter the sales tax codes (choose a short one if you want to print it in the statement).
  • Enter the full name in the “Name” field.
  • Select the settlement period (created in step 3).
  • Select the ledger posting group for this code (created in step 1).
  • Select ohter option: currency, print code, calculations parameters, …

SalesTaxGL005

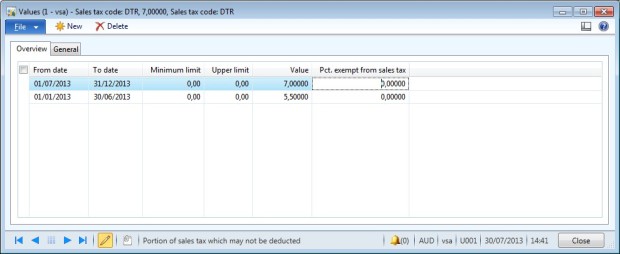
  • Click on “Values” to add a rate.
  • You don’t need to enter dates for the first rate (if there is only one rate).
  • You can enter a rate by amount range, and choose the option “interval” in the calculation method.

SalesTaxGL006

Remarks:

  1. If the rate of a sales tax change, you don’t have to create a new code, but just add a new rate in the value screen with the start date, and add an end date to the old rate.
  2. When you create a sales tax code, don’t put the rate in the name, because the rate can change.

6/ Step 5: Sales tax group

Access: General Ledger > Setup > Sales tax > Sales tax groups

To identify the number of group you need, look for the criteria of the application of the sales tax related to the customer or the vendor. Example: national or international customer, vendor with VAT on invoice or VAT on cash receipt, vendor of goods or fixed assets vendor, …

  • Click New to create a new sales tax group.
  • Enter the code of the sales tax group.
  • Enter a description.
  • In the tab “Setup” add all the sales tax codes than can be suitable for the sales tax group.

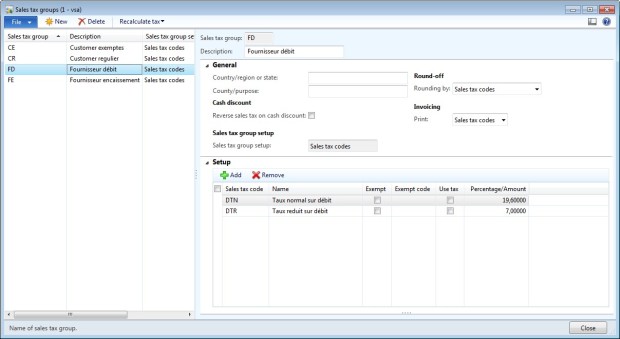
SalesTaxGL007

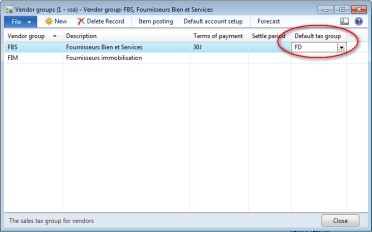
  • The sales tax group will be link to the vendor/customer by the vendor/customer group or directly on the vendor/customer screen.

SalesTaxGL008

7/ Step 6: Item sales tax group

Access: General Ledger > Setup > Sales tax > Item sales tax groups

To identify the number of group you need, look for the criteria of the application of the sales tax related to the items. Example: item with normal rate or with reduced rate, exempted item, …

  • Click New to create a new item sales tax group
  • Enter a code to the item sales tax group.
  • Enter a description.
  • In the tab “Setup” add all the sales tax codes than can be suitable for the item sales tax group.

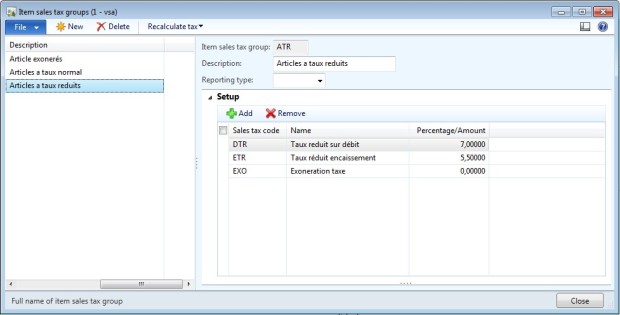
SalesTaxGL009

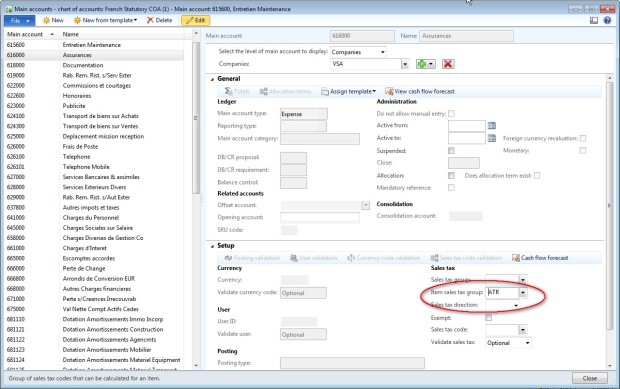
  • The item sales tax group can be linked to the item or to a general account (if the account is setup at the company level).

SalesTaxGL010

8/ Example for customer invoices

The ABC company need 4 sales tax codes for the customer invoices:

  • Sales tax with normal rate for national customer (code STNN)
  • Sales tax with normal rate for international customer (code STIN)
  • Sales tax with reduced rate for national customer (code STNR)
  • Sales tax with reduced rate for international customer (code STIR)

We need to create 2 sales tax groups :

  • One group for the national customers (code CN): with the sales tax codes STNN & STNR
  • One group for the international customers (code CI): with the sales tax codes STIN & STIR

We need to create 2 item sales tax groups:

  • One for the normal rate (code IN): with the sales tax codes STNN $ STIN
  • One for the reduced rate (code IR): with the sales tax codes STNR & STIR

Sales tax code deduced from a sale to a national customer:

SalesTaxGL011

Sales tax code deduced from a sale to an international customer:

SalesTaxGL012

9/ Example in a vendor invoice

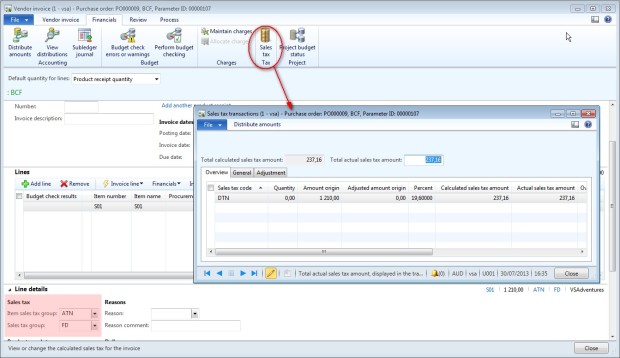
Access: Accounts payable > Common > Purchase order > All purchase orders > Invoice

SalesTaxGL013

Financial statement example: Budget statement

The objective of this article is to describe the setup of a budget report by using the financial statement functionality in DynamicsAX 2012.

1/ Report

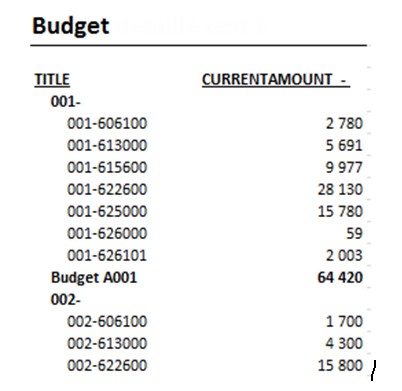
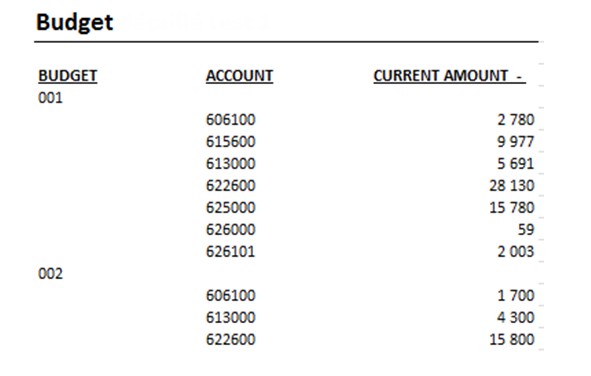
Example of report

FinancialStatementGL025

2/ Step 1: Dimension sets

Access: GL > Setup > Financial Dimensions > Financials Dimensions sets

  • First dimension set with the budget dimension

FinancialStatementGL026

  • Second dimension set with the main account

FinancialStatementGL027

3/ Step 2: Row definition

Access: GL > Setup > Financial statement > Row definition

  • First row definition for the budget organization:
    • Two lines with the type “Group” to create a title and a subtotal
    • One line with the type “Dimension” for each budget dimension

FinancialStatementGL028

  • Second row definition for the main account organization:
    • Selection of charge account to be display in the statement.
    • Values are created with the type “dimension”.

FinancialStatementGL029

4/ Step 3: Column definition

Access: GL > Setup > Financial statement > Financial statement

  • Statement “BUD_Detail”
  • Select one primary dimension set : budget dimension
  • Select one second primary dimension set : main account

FinancialStatementGL030

  • Detail of “Current period” column. (date interval code are created in GL > Setup > Periods > Interval date)

FinancialStatementGL031

  • Details of “Diff” column

FinancialStatementGL032

5/ Step 4: Link all the elements

Access: GL > Setup > Financial statement > Financial statement

  • Select row definition for primary dimension set
  • Select row definition for secondary dimension set

FinancialStatementGL033

Financial statements: general setup

This article describes how to setup a financial statement in GL module in Dynamics AX 2012.

1/ Introduction

The financial statement functionality in AX 2012, is a tool that allow to create a personalize report to analyze ledger balances. It’s possible to create all the report you need with each dimension and main account.

To create a financial statement, there are 5 steps:

FinancialStatementGL001

(*) Mandatory

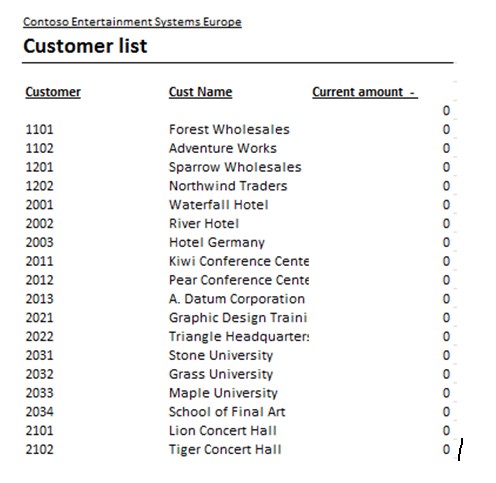
Example of a financial statement:

FinancialStatementGL002

2/ Financial Statement : Prerequisite

Before creating your statement in AX2012: take a model or draw the statement you need.
  • Determine which dimension you need (included main account)
  • Determine if all the value of a dimension are used or if you need a selection.
  • Identify in each rows if it contains: values, calculation or title.
  • Identify in each columns which period and amount you need (D/C/both; budget/current ; calculation…)

3/ Create a financial statment

  • 3.1 / Step 1 : Dimensions set

Create several dimension sets as you need and at least one per dimension. You can select main account or dimension. Exemple : Main account + Budget, Customer, Cost center + department…

Access: GL > Setup > Dimension > Dimension set

> Click on new

> Enter a code in the field “Financial Dimension set”

> Enter a description in the field “Name”

FinancialStatementGL003
> In the tab “Financial dimensions”, select one or several dimension (included main account) and put them in the order you need to use it.
FinancialStatementGL004
  • 3.2/ Step 2: Row definition

The row definition allows to organize the row structure. It is not mandatory. If you just want a list of dimension value, you can create a financial statement without a row definition.

Example without a row definition:

FinancialStatementGL005

Example with a row definition:

FinancialStatementGL006Create a row definition:

Access: GL > Setup > Financial statement > Row Definition

> Click on new

> Enter a code in the field “Row definition”

> Enter a short description in the field “Name.

> Select a dimension set.

> The field « Depth » is automatically updated by AX.

FinancialStatementGL007

Row definition: Structure designer

> Click on “Structure designer” to setup the row definition.

> Click on “create” to add a row.

> Select the type: “Dimension” to add dimension value, “Group” to make a group of dimension values, “Structure” to select another row definition, “Calculation” to add a calculation row (total, percent,…), “Exception” to add at the end of the report the row not used.

> Click on “Edit” to setup or update the row.

FinancialStatementGL008

Type “Dimension”:

> If you need one dimension value: select  the value

> If you need a range of value: write « VALUExx..VALUEyy»

> If you need all the dimension than begin by the same value : write VALUE*

FinancialStatementGL009

Type “Group”:

> Create a parent

> Select “Header” if this line should be header line.

> Select “Subtotal” to some all the child of the row.

> Select other option you need.

FinancialStatementGL010

Type “Structure”:

If several statements have the same structure, you can create a row definition for the common structure and use it in other main row definition.

FinancialStatementGL011

Type “Calculation”:

> Select dimensions or group to sum.

> To write the calculation expression use the button « sum up »

FinancialStatementGL012

Type “Exception”: You can add at the end of the statement a list of missing row or duplicate row.

FinancialStatementGL013

Simulate row definition

Use button “Simulate” to check if all the values you need are in the structure.

  • 3.3/ Step 3: Column definition

The column definition is in the bottom tab of the financial statement screen.

Access: GL > Setup > Financial statement > Financial statement

FinancialStatementGL014

> Click on “New” to create a new financial statement

> Select the dimension set : if the statement is going to use a row definition, select the same dimension set.

> You can choose a secondary dimension set.

FinancialStatementGL015

Dimension set options:

If you statement need to analyze two dimensions, you can choose to use one dimension set with two dimensions or to join two dimension sets with one dimension each.

Example 1: one dimension set with two dimensions

FinancialStatementGL016

Example 2: two dimension sets

FinancialStatementGL017Columns options:

When you create a new column, it takes the number “0” temporary, after validation, you can move the column with button « Up » and « Down ».

> Click on “Add” to create a new column.

> Enter the title of the column  in the field “name”

> Select the column type:

– Primary dimension set code : to display the code of the first dimension

– Primary dimension set name : to display the description of the first dimension

– Secondary dimension set code : to display the code of the second dimension

– Secondary dimension set name : to display the description of the second dimension

– Current : to display the current balance of the main account/dimension

– …

FinancialStatementGL018

Column with amount:

When the column contains amount (type current or budget for example):

-you can add a date interval code to specify a period (previous period, quarter, current year, last year, …)

FinancialStatementGL019– you can add a selection with other criteria : click on « Select » button and add a filter. Select the field : Currency, Ledger account, amount, quantity,…

FinancialStatementGL020

-you can choose to print only debit amount or credit amount.

FinancialStatementGL021

Column with calculation

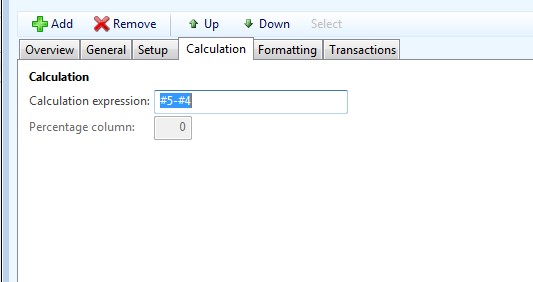
When the column type is « calculation »: write the expression in the tab « Calculation ».Write « # » and the number of the column and use calculation symbols (+-/*).

FinancialStatementGL022

  • 3.4/ Step 4 : link all the elements

Access: GL > Setup > Financial Statement > Financial statement

In the tab “Setup”:

  • Select the primary dimension set
  • Select a second dimension set if you need
  • Select a row definition for the primary dimension set
  • Select a row definition for the second dimension set
  • Select default option for the statement: Header line, Skip zero, …

FinancialStatementGL023

4/ Generate the statement

Access: GL > Report > Transaction > Financial Statement

  • Select financial statement
  • Select an output type
  • Select date if you need
  • Other informations are updated automatically with the default options setup in the financial statement. You can change default value.

FinancialStatementGL024

Setup Accrual schemes

This article describes how to setup and use accrual schemes in Dynamics AX 2012. Ledger accruals redistribute the costs or revenues of a journal line so that the costs and revenues are recognized in the appropriate periods. In the first step, you enter the invoice in a temporary account (or a prepaid account). And when you use the accrual scheme functionality, the temporary account is reversed to be allocated in the charge or product account in each appropriate periods. To illustrate this functionality, I will use two examples, one with a vendor invoice and one with a customer invoice:

  • Example 1: I receive a rent invoice from a vendor for the next quarter. Total amount of the invoice is $300. If I enter directly the amount, all the charge are going to be allocated for the same period. But I want to allocate each third in the good period.
  • Example 2: I send a rent invoice to a customer for the next quarter. Total amount of the invoice is $300. If I enter directly the amount, all the product is going to be allocated for the same period. But I want to allocate each third in the good period.

1/ Setup accrual schemes

Access: GL > Setup > Posting > Accrual schemes

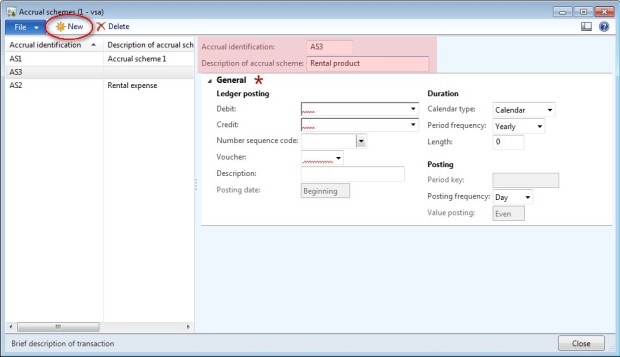
  • Click New to create an accrual scheme.
  • Enter an accrual identification and a description of the scheme

AccrualSchemesGL001

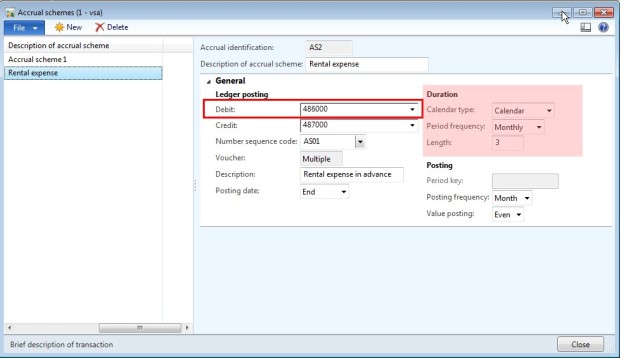
For a charge accrual scheme (example 1) :

  • Enter the accrual account in the field “Debit” and an other account in the field “Credit”.
  • Select how to use voucher:
    • Base: the main voucher number is used for all generated transactions.
    • Single: a new voucher number is used for each transaction date.
    • Multiple:  a new voucher number is used for all accrued transactions.
  • If you have selected the single or multiple option, select a sequence code.
  • Enter a description.
  • Select the calendar type to use, the frequency and the length. In the case of the example 1, I want to follow the calendar type (not fiscal), for 3 months.
  • Select the posting frequency: in my example, I want to post the accrual scheme each month.
  • In the field “Value posting”, select the option of the calculation : Even = same amount for each period or scale = amount depend of the number of the days.
  • Select the posting date : beginning, middle or end.

AccrualSchemesGL003

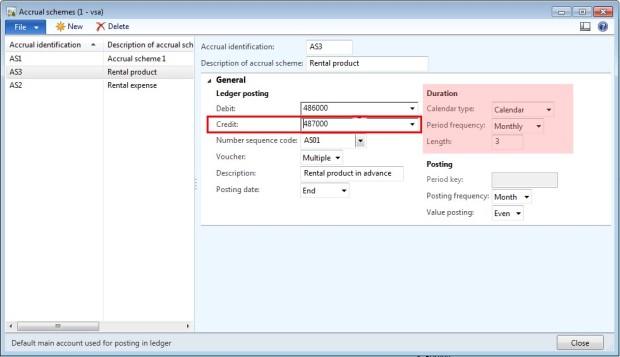
For a product accrual scheme (example 2) :

  • Enter the accrual account in the field “Credit” and an other account in the field “Debit”.
  • Select how to use voucher: Base, Single or Multiple. If you have selected the single or multiple option, select a sequence code.
  • Enter a description.
  • Select the calendar type to use, the frequency and the length. In the case of the example 2, I want to follow the calendar type (not fiscal), for 3 months.
  • Select the posting frequency: in my example, I want to post the accrual scheme each month.
  • In the field “Value posting”, select the option of the calculation : Even = same amount for each period or scale = amount depend of the number of the days.
  • Select the posting date : beginning, middle or end.

AccrualSchemesGL002

2/ Accrual scheme : Charge

Example 1: I receive a rent invoice from a vendor for the next quarter. Total amount of the invoice is $300. If I enter directly the amount, all the charge are going to be allocated for the same period. But I want to allocate each third in the good period.

AccrualSchemesGL004

Step 1: Enter the invoice

Access: AP > Journals > Invoices journal (or use purchase order)

  • Create a new journal
  • Go to the line and create a new journal line.
  • Select the vendor account, VAT account if necessary, and other information (invoice number, terms of payment, …)
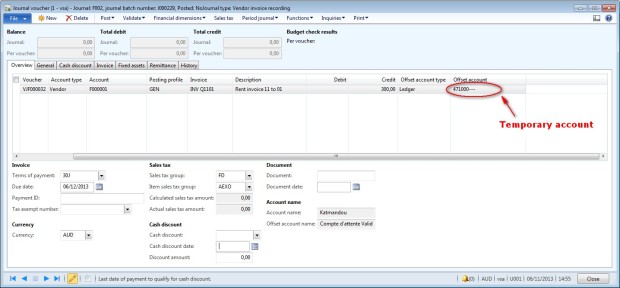
  • Select a temporary account in the offset account field and not the charge account.

AccrualSchemesGL005

  • Post the journal
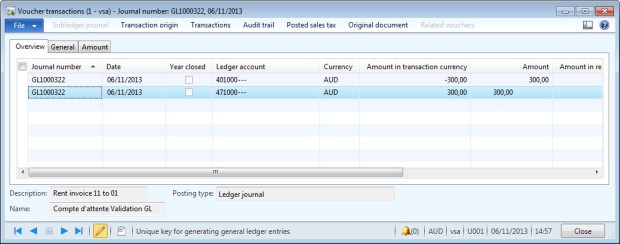
  • Go to Inquiries > Voucher to check the accounting: Debit = temporary account and Credit = Vendor account

AccrualSchemesGL006

Step 2: Accrual schemes

Access: GL > Journals > General journal

  • Create a new journal
  • Go to the line and create a new journal line.
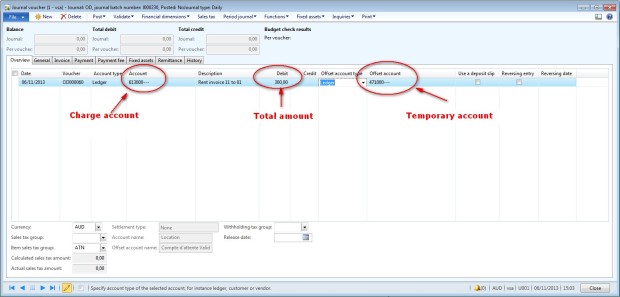
  • In the field account, select the charge account.
  • Enter the total amount of the invoice in the debit field ($300)
  • Select the temporary in the Offset account field.

AccrualSchemesGL007

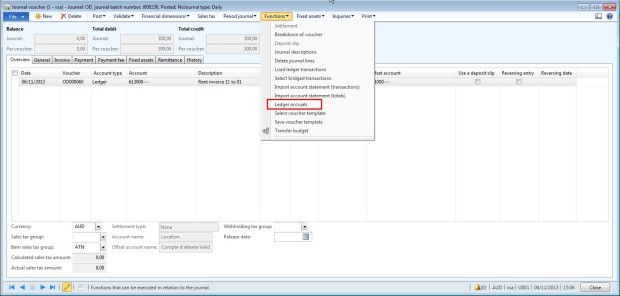
  • Go to Function > Ledger accrual

AccrualSchemesGL008

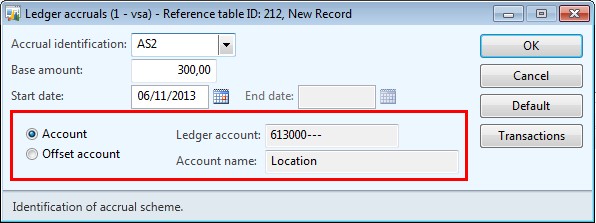
  • Select the accrual schema to use
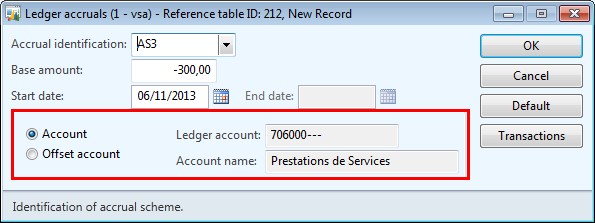
  • Check that the charge account is selected in the field “Account/Ledger account”

AccrualSchemesGL009

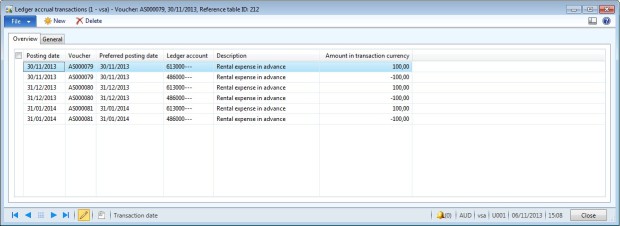
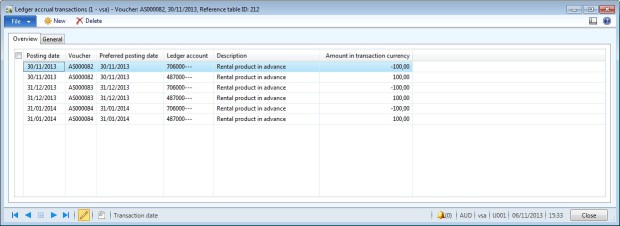
  • Click on “Transactions” to check if the accounting is correct.

AccrualSchemesGL010

  • In the example, we have 3 voucher with amount equal $100 (300/3) and each accounting date equal to the end of the three months.
  • Accounting for each voucher is: Debit = charge account and Credit = accrual account.
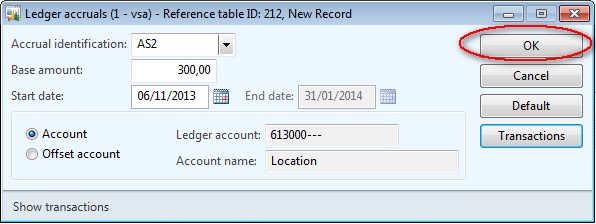
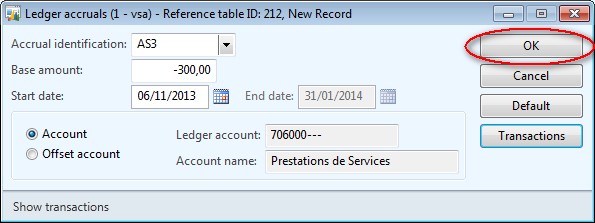
  • If the transactions are not correct, click on “Cancel”.
  • If it is correct, click on “OK”

AccrualSchemesGL011

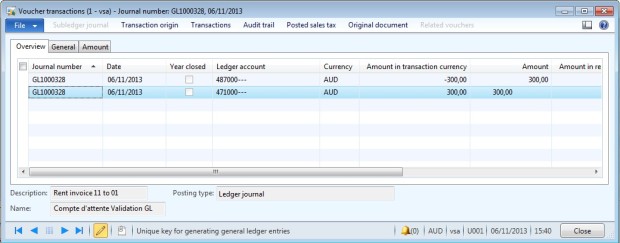
  • Post the journal.
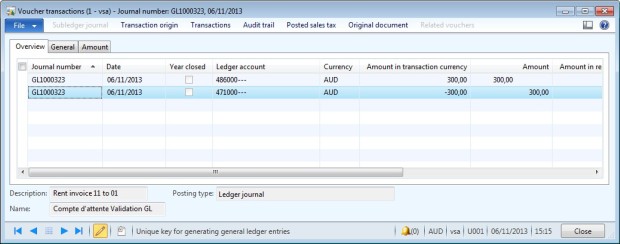
  • Go to Inquiries > Voucher to check the accounting: Debit = Accrual account for the total amount and Credit = Temporary account.

AccrualSchemesGL012

3/ Accrual schemes : Product

Example 2: I send a rent invoice to a customer for the next quarter. Total amount of the invoice is $300. If I enter directly the amount, all the product is going to be allocated for the same period. But I want to allocate each third in the good period.

AccrualSchemesGL013

Step 1: Enter the invoice

Access: AR > Common > Free text invoice > All free text invoices (or use a GL journal)

  • Create a new free text invoice
  • Select the customer account and other information you need.
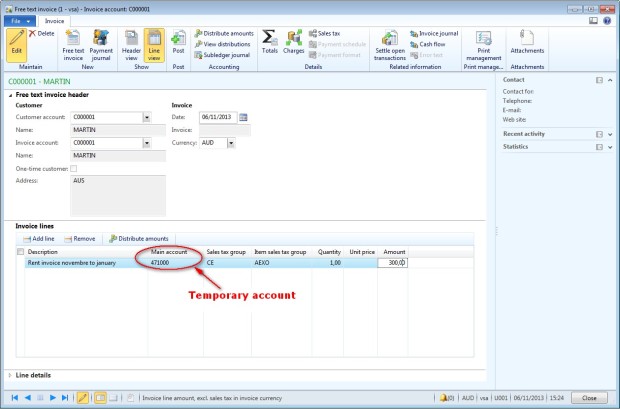
  • Select a temporary account in the account field and not the product account.

AccrualSchemesGL014

  • Post the invoice
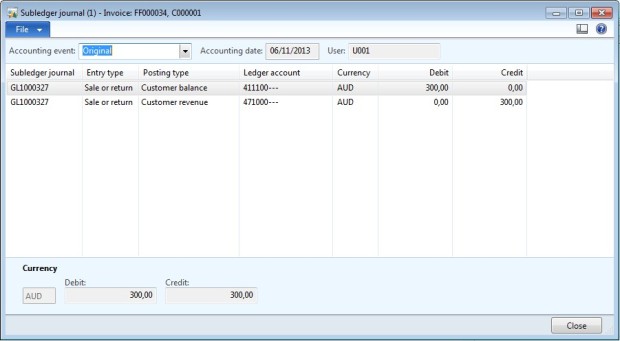
  • Check the accounting: Debit = Customer account and Credit = Temporary account.

AccrualSchemesGL015

Step 2: Accrual schemes

Access: GL > Journals > General journal

  • Create a new journal
  • Go to the line and create a new journal line.
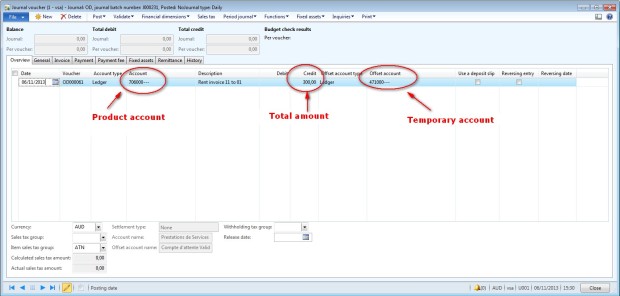
  • In the field account, select the product account.
  • Enter the total amount of the invoice in the credit field ($300)
  • Select the temporary in the Offset account field.

AccrualSchemesGL016

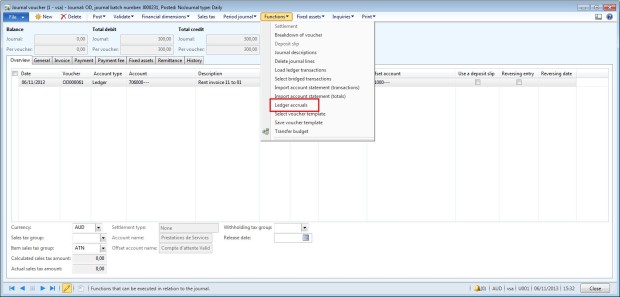
  • Go to Function > Ledger accrual

AccrualSchemesGL017

  • Select the accrual schema to use
  • Check that the product account is selected in the field “Account/Ledger account”

AccrualSchemesGL018

  • Click on “Transactions” to check if the accounting is correct.

AccrualSchemesGL019

  • In the example, we have 3 voucher with amount equal $100 (300/3) and each accounting date equal to the end of the three months.
  • Accounting for each voucher is Debit = accrual account and Credit = Product account.
  • If the transactions are not correct, click on “Cancel”.
  • If it is correct, click on “OK”.

AccrualSchemesGL020

  • Post the journal.
  • Go to Inquiries > Voucher to check the accounting: Debit = Temporary account for the total amount and Credit = Accrual account.

AccrualSchemesGL021

4/ Ledger settlements

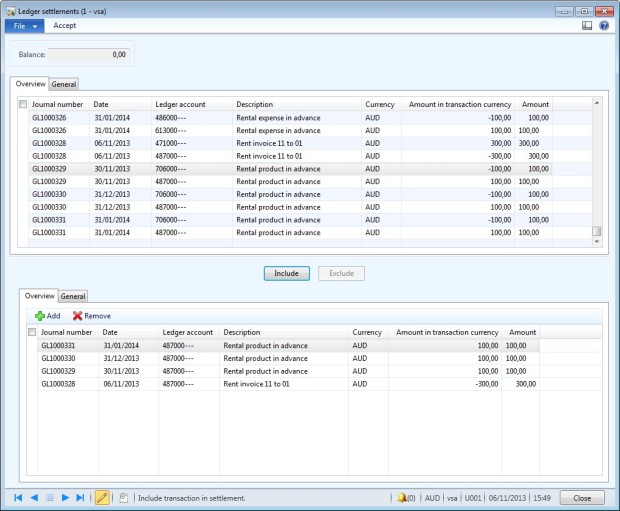
To close this process, you need to pay the invoice and it is better to settle the temporary account and the accrual account.

Access: GL > Periodic > Ledger settlements

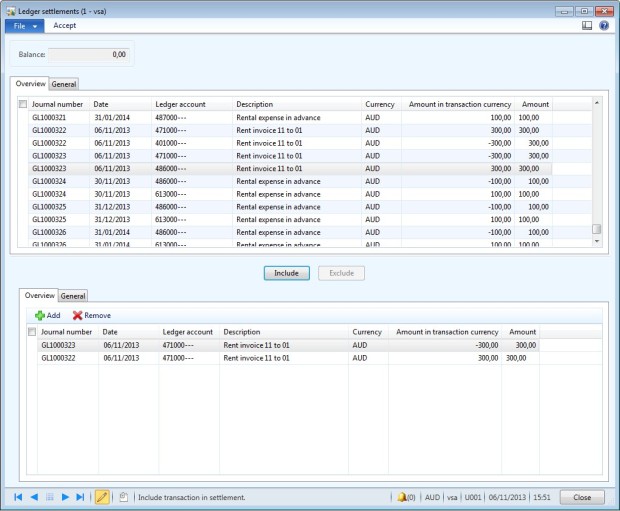
  • Search the two journals that used the temporary account. In the example 1 it was GL100322 for the AP journal and GL100323 for the GL journal.
  • Select the two transactions (button Include).
  • In the top of the form, the balance should be equal to 0
  • Accept the settlement

AccrualSchemesGL023

  • You can do the same for the accrual account

AccrualSchemesGL022

Setup Ledger allocation rule

This article describes how to setup and use ledger allocation rules in Dynamics AX 2012. This functionality can be used to allocate a global amount in several combinations of account/financial dimensions. The key of the repartition can be fixed or linked to another account. In an allocation rule, there are several components:

  • the source: select the account/dimension you want to allocate. The total of the amount from all the journals will be the base of the allocation.
  • the destination: select all the combinations of account/dimensions that will receive an amount.
  • the rule: select the way of calculation of the allocation. It can be fixed (enter directly a percentage) or variable (with a linked to another account for example).

AllocationRulesGL008

The allocation rule, can be setup with several methods:

  • Option A: Basis allocation method
  • Option B: Fixed percentage method
  • Option C: Fixed weight
  • Option D: Distribute the source document amount equally.

To illustrate this Dynamics AX functionality, I will use an example: the accountant want to allocate the amount of the insurance of the budget “004” into 3 different budgets. The amount of the insurance to allocate is in the account 616000-004.

  • Option A: the allocation rule is based on the amount of the property rental (account 613200) for each budget.
  • Option B: the allocation rule is based on a fixe percentage: 10%for budget 001, 35% for budget 002 and 55% for budget 003.

Prerequisites

Before using allocation rule, you need to create a new Journal name with the journal type “Allocation”

Access: GL > Setup > Journals > Journals names

  • Create a new journal
  • Select the journal type “Allocation”
  • Select a voucher series.

AllocationRulesGL010

Option A: Basis allocation method

You need to use a basis when you want to allocate an amount in several combination of main accounts and dimensions based on another main account/dimension amount. In the case of a basis method, you need to setup a “Ledger allocation basis”.

With the example, I have an amount of insurance charge from a budget (account 61600 with budget 004) that I want to allocate in 3 others budgets. The allocation is based on the amount of the property rental (account 613200) for each budget:

  • Insurance charge to allocate : account 616000 – 004 = $12000
  • Destination of my allocation : 616000 – 001 / 616000 – 002 / 616000 – 003
  • Base of the repartition : Amount of the account 613200 for each budget (001, 002 and 003).
  • Amount in the accounting :
    • 613200 – 001 = 10000
    • 613200 – 002 = 15000
    • 613200 – 003 = 25000

AllocationRulesGL009

Step 1 : Create ledger allocation basis

Access: GL > Setup > Posting > Ledger allocation basis

  • Create one basis rule for each combination of account/dimension. In the example we need to create 3 rules.
  • Enter a description
  • Click on Basis

AllocationRulesGL006

  • Create a first line and select “Main account” in “Field setting”,
  • In “Source criteria”, select the main account. In the example, the value 613200,
  • Create a second line and select “Financial Dimension” in “Field setting”,
  • In financial dimension filed, select the dimension you need. In the example, it is “budget”,
  • In “Source criteria”, select the main account. For the first rule, it is “001”.

AllocationRulesGL007

  • Create two other rules with the 2 other budget values.
  • Click on active of each ledger allocation basis.

Step 2: Create ledger allocation rules

Access: GL > Setup > Posting > Ledger allocation rules

  • Create a new ledger allocation rule
  • Enter a description

AllocationRulesGL001

  • Go to the “General” tab,
  • Select the allocation method “Basis”,
  • Select a journal name .

AllocationRulesGL002

  • Go to the Offset tab,
  • Select the offset account. In the example, I want to credit the same account used in the source (61600-004) to have a zero balance after the allocation.

AllocationRulesGL003

  • Click on “Source”
  • Select the main account. In the example, the value is the main account 616000.
  • You can create an other line to add a financial dimension. In the example, I add a second line with the dimension Budget.

AllocationRulesGL004

  • Click on “Destination”
  • Create a first line with the first Basis rule. Select the Basis rule, the ledger account  and financial dimension of the destination (616000-001)
  • Create a second line with the second basis rule and the ledger account and financial dimension of the destination (616000-002).
  • Create a third line with the third basis rule and the ledger account and financial dimension of the destination (616000-003).

AllocationRulesGL005

  • Go back to the first form and active the rule.

Step 3: Execute allocation rule

In the example, we want to have this results:

AllocationRulesGL011

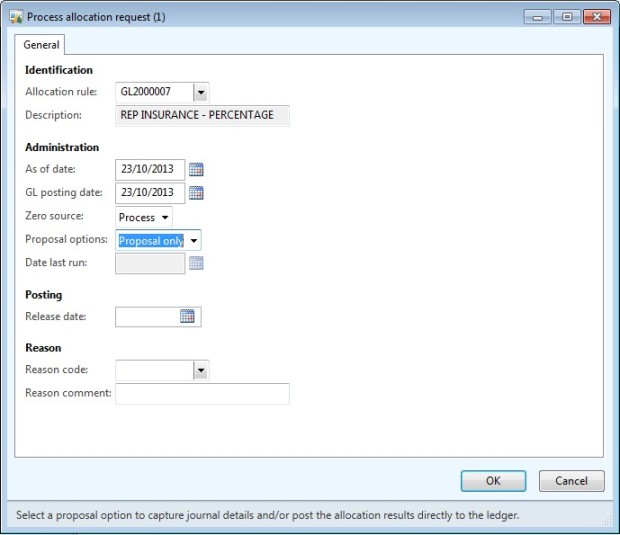
Access: GL > Periodic > Process allocation request

  • Select the allocation rule,
  • Select the start date to retreive amount for the allocation,
  • In proposal option, select “Proposal only” to be able to check the journal or “Post anly” to directly post the journal.

AllocationRulesGL012

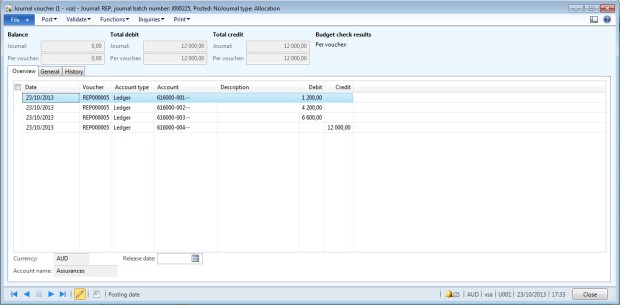
Access: GL > Journals > Allocation

  • Open the new allocation journal created by Dynamics AX.
  • Post the journal if all is OK.
  • In the example, I have the amount of the account 616000-004 is allocate into the 3 other budgets according to the amount of the account 613200 for each budget.

AllocationRulesGL013

Option B: Fixed percentage method

With the example, I have an amount of insurance charge from a budget (account 61600 with budget 004) that I want to allocate in 3 others budgets. The allocation is based on fixed percentage:

  • Insurance charge to allocate : account 616000 – 004 = $12000
  • Destination of my allocation : 616000 – 001 / 616000 – 002 / 616000 – 003
  • Base of the repartition : 10% for budget 001, 35% for budget 002 and 55% for budget 003

AllocationRulesGL021

Step 1: Create ledger allocation rule

Access: GL > Setup > Posting > Ledger allocation rules

  • Create a new ledger allocation rule
  • Enter a description
  • When the rule is created, don’t forget to click on “Active” to be able to use it.

AllocationRulesGL014

  • Go to the tab “General”
  • Select the allocation method “Fixed percentage”
  • Select a journal name.

AllocationRulesGL015

  • Go to the tab “Offset”
  • In this example, I want to reversing the initial account/dimension, so I select Source. But you can specifed an other account.

AllocationRulesGL016

  • Click on “Source”
  • Create a new line and select the main account. in the example the value is 616000.
  • Create a second line and select the financial dimension “Budget” with the value 004 for this example.

AllocationRulesGL017

  • Click on “Destination”
  • Create a first line for the first destination : account 616000-001 with the fixed percentage 10%
  • Create a second line for the second dimension 002: account 616000-002 with  fixed percentage 35%
  • Create a third line for the the third dimension 003: account 616000-003 with  fixed percentage 55%
  • Check that the total percentage is equal to 100.

AllocationRulesGL018

Step 2: Execute allocation rule

Access: GL > Periodic > Process allocation request

  • Select the allocation rule,
  • Select the start date to retreive amount for the basis of the allocation,
  • In proposal option, select “Proposal only” to be able to check the journal or “Post anly” to directly post the journal.

AllocationRulesGL019

Access: GL > Journals > Allocation

  • Open the new allocation journal.
  • Post the journal if all is OK.
  • In the example, I have the amount of the account 616000-004 is allocate into the 3 other budgets according to the percentage of the rule.

AllocationRulesGL020

Setup periodic journal

This article describes how to setup and use periodic journal in Dynamics AX 2012.  Periodic journals are sometimes called recurring journals because the amount, text, and other information are repeated each time that the journal is posted. When you create the journal, you can specify the period interval for the recurrence, such as days or months.

PeriodicJournalGL001

1/ Prerequisites

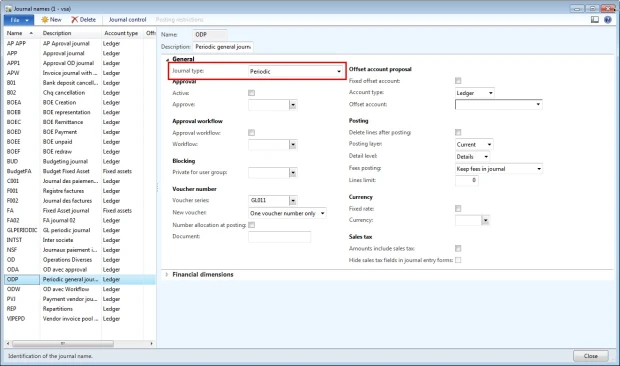
You need to create a new journal name to use the periodic journal functionality.

Access: GL > Setup > Journals > Journal name

PeriodicJournalGL005

2/ Setup periodic journal

To setup a periodic journal, there are several options : create periodic journal from the general journal form or from the periodic journal form.

Option A: General journal form

Access: GL > Journals > General journals

  • Create a new journal
  • Go to the line form an enter all your data (date, accounts, amounts, description, …)

PeriodicJournalGL002

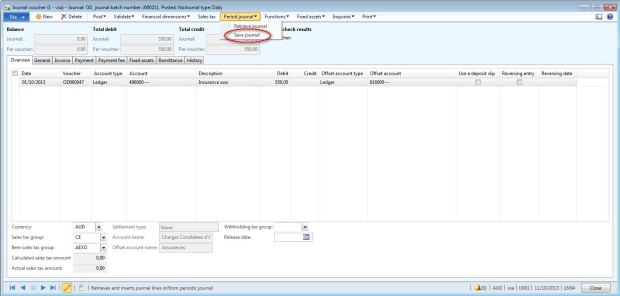
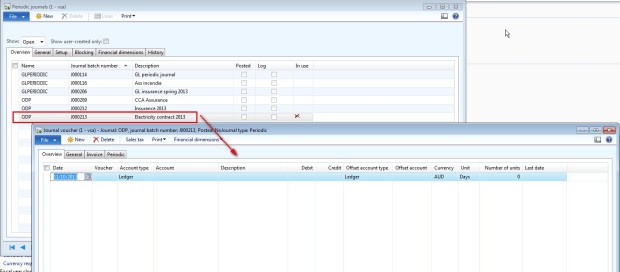
  • Click on Period journal > Save Journal

PeriodicJournalGL003

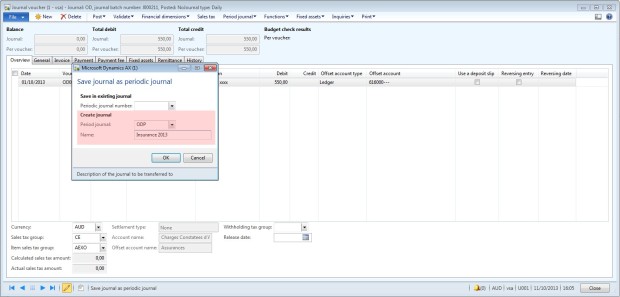
  • Select a periodic journal
  • Enter a name.
  • Click on “OK”

PeriodicJournalGL004

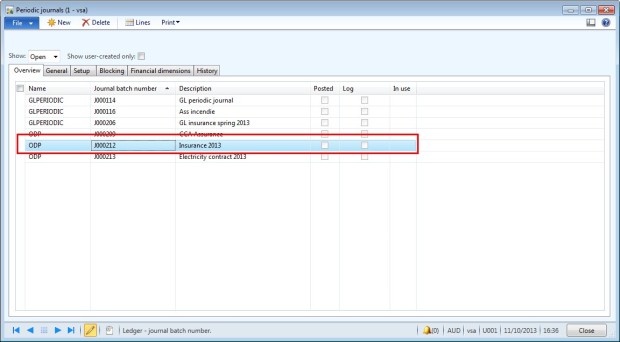
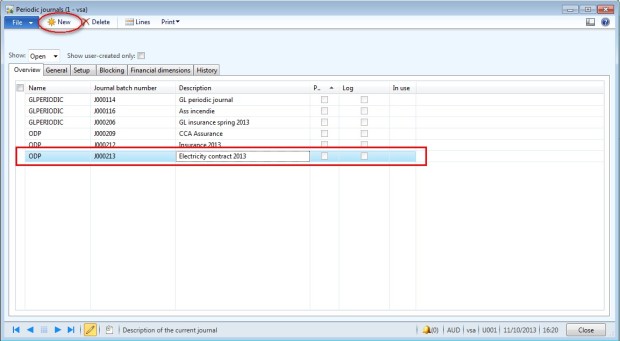
  • Go to Periodic > Journals > Periodic journals to update data

PeriodicJournalGL009

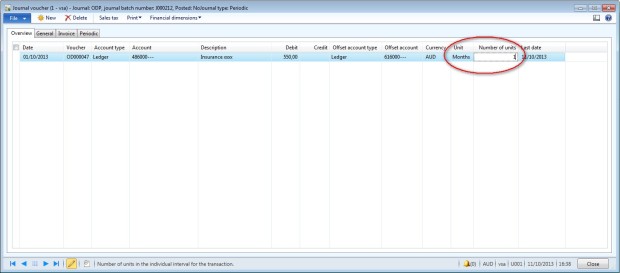
  • Click on Lines
  • Enter (if needed) a unit and a number of unit : for example, if the journal must be posted every months, enter unit = month and number of unit = 1.

PeriodicJournalGL010

Option B: Periodic journal form

This option is better if you need to setup period interval recurrence.

Access: GL > Periodic > Journals > Periodic journals

  • Click on New
  • Select a periodic journal name
  • Enter a description

PeriodicJournalGL006

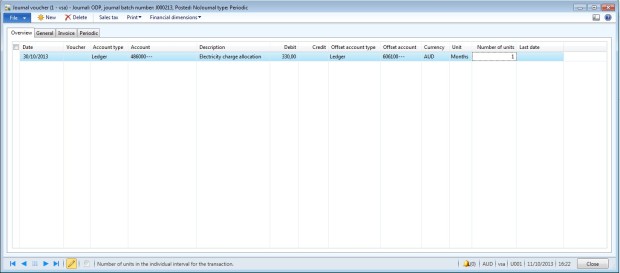
  • Go to the lines form
  • Enter a date (firs date)
  • Enter regular data : account, offset account, amount, description, …
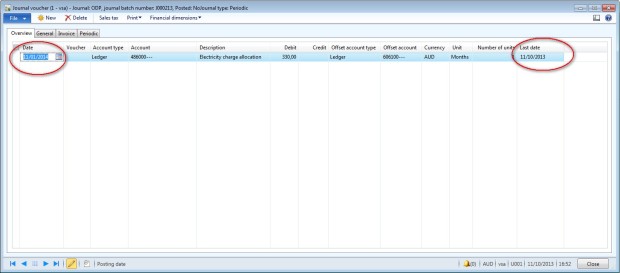
  • Select a unit and a number of unit : for example, if the journal must be posted every months, enter unit = month and number of unit = 1.
  • The “Last date” field will be updated automatically by the system.

PeriodicJournalGL007

3/ Use a periodic journal

Access: GL > Journals > General journal

  • Create a general journal
  • Go to the Lines form
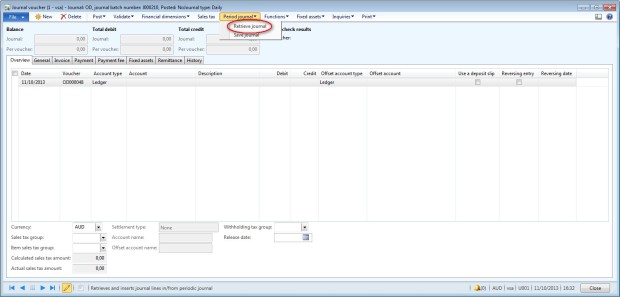
  • Click on Period journal > Retrieve journal

PeriodicJournalGL008

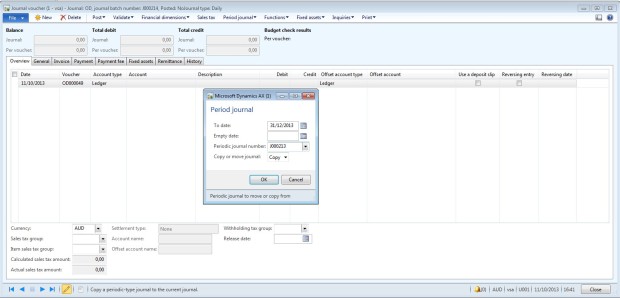
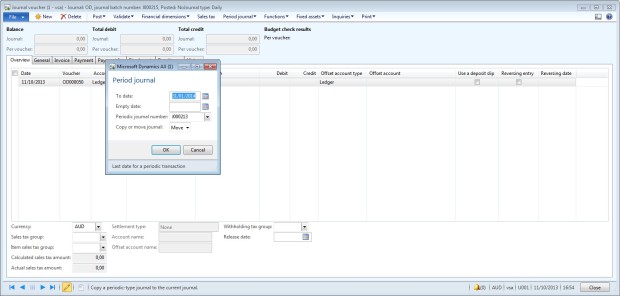
  • Enter a “To date”
  • If the line in the periodic journal does not have a transaction date, you can select one in the Empty date field. If you do not select a date in this field, the date in the To date field becomes the transaction date.
  • Select a periodic journal
  • Select an option: Copy or Move. (choose Move only if you do not need to use again the periodic journal)

PeriodicJournalGL011

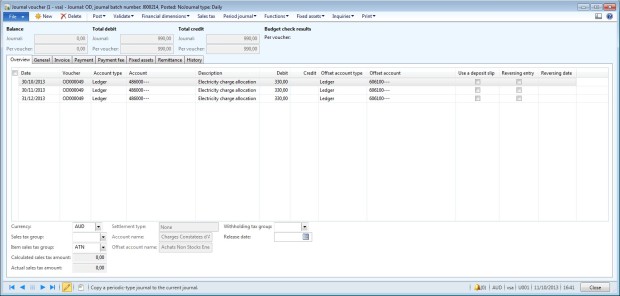
  • Journal lines are created. In this example, the to date is 3 months later than the today date, that why the system creates 3 lines, one per month.
  • Check the journal and post it.

PeriodicJournalGL012

Remark : When a journal is created, the periodic journal is automatically updated : the date become the next date and the Last date is updated with the journal date. 

PeriodicJournalGL013

4/ Use a periodic journal with option Move

Access: GL > Journals > General journal

  • Create a general journal
  • Go to the Lines form
  • Click on Period journal > Retrieve journal
  • Enter a “To date”
  • Select a periodic journal
  • Select “Move”

PeriodicJournalGL014

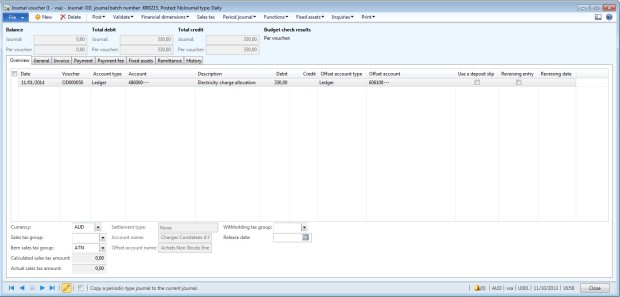
  • Journal line is created.

PeriodicJournalGL016

  • Periodic journal line is deleted

PeriodicJournalGL015

Setup General journal voucher template

This article describes how to setup and use a voucher templates in a general ledger journal. In the general journal form, you can create and use voucher template. This functionality is helpful when you have to create several time the same journal lines.

JournalTemplateGL001

1/ Create a voucher template

Access: GL > Journals > General journals

  • Select the general journal to save as a model.
  • Click on button Line.
  • Click on Function > Save voucher template

JournalTemplateGL002

Remark: one voucher template = one voucher number. If you want to save an invoice with several lines, they must have the same voucher number.

  • Choose the option that is suitable to you :
    • “Amount”: If the amount of the model if the same for all general journals.
    • “Percent”: If the repartition between the financials dimensions or accounts should be divided by the percentage of the amount of the voucher.

JournalTemplateGL003

Remark: you can not choose the name of your voucher template. But you can create a sequence number to use only for the general journal model (you don’t need to post the journal to save a template).

2/ Use a voucher template

Access: GL > Journals > General journals

  • Create a new journal
  • Click on Line
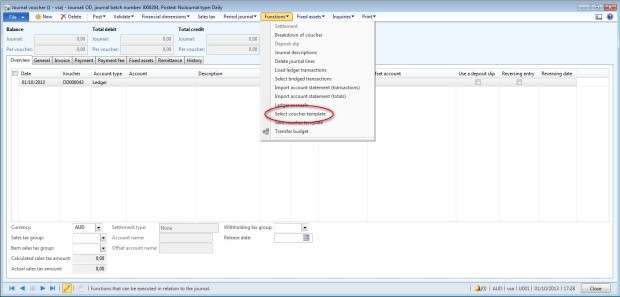
  • Click on Function > Select a voucher template

JournalTemplateGL004

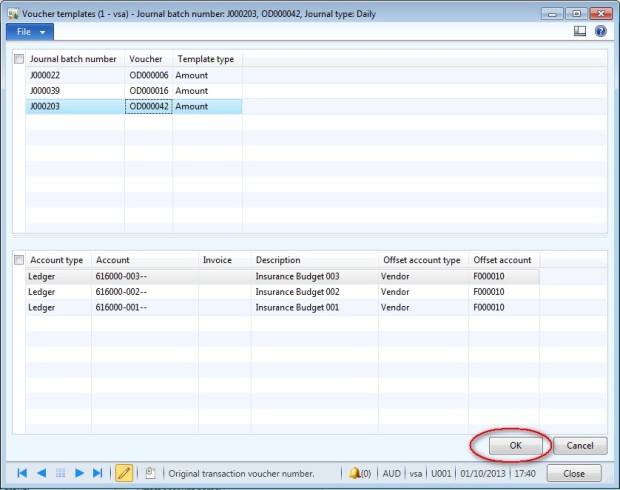
  • Option Amount : select the voucher template to use and click on OK.

JournalTemplateGL005

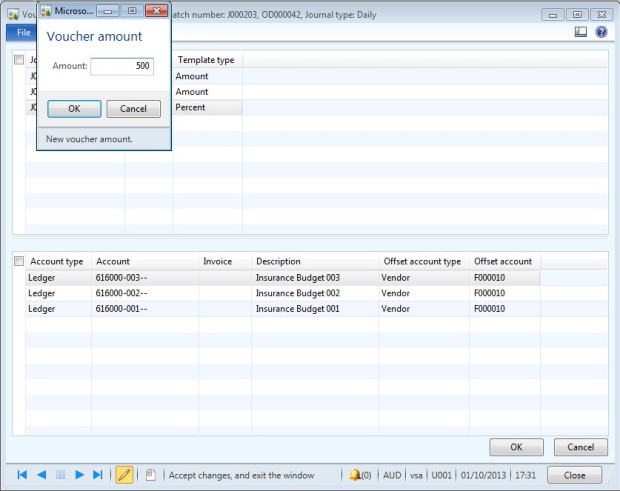
  • Option Percent: select the voucher template to use, click on OK and enter the amount of the general journal

JournalTemplateGL006

  • The general journal is created.
  • Update field if necessary and post the journal as a regular general journal.
    • Option Amount : same amount as in the model.

JournalTemplateGL008

  • Option Percent : total amount 500 is distribute between the lines of the model

JournalTemplateGL007

Configure account structures

This article describes how to use the configure account structures form in Dynamics AX 2012. The configure account structures functionality is used to define valid combinations of main account and financial dimensions as well as the seizure order from the main account and dimensions.

1. Presentation

When you post a transaction in Dynamics AX, the accounting is done in the main account, but it can also be done in several financial dimension. The account structure allows to define valid combinations of main account and financial dimension. If you don’t need the same information for a balance transaction that for a purchase transaction, you can create several structure.

For example, I need to have a department dimension for all the main accounts. For the profit and loss account, I need to have in addition the cost center dimension. And the last requirement is to be able to follow the budget for all the purchase transaction.
image

For this example, I need to create 3 accounts structures :

  • AS1: All Balance account + Department dimension.
  • AS2: All Purchase account + Department dimension + Cost center dimension + Budget dimension.
  • AS3: Profit &Loss account exclude purchase account in AS2 + Department dimension + Cost center dimension.

Remarks:

  • Define one account structure rule per “account-dimension key”.
  • All the account to use for budgeting must be in the same structure.
  • If you need a “fixed blank” dimension, use a specific account structure without the dimension.

2. Setup account structures

Access: GL > Setup > Chart of account > Configure account structure

  • Click on “Account structure New”
  • Enter the account structure code
  • Enter a description
  • Select “Add main account” if needed.

image


Example 1: Create AS1 (Balance account + Department)

  • Go to the Main account column and click to the filter.
  • Select “Specify which values are allowed”
  • Enter the rule

image

  • In this example, I want to select all my balance account.
  • In my chart of account, balance accounts are all accounts contained between 100000 and 599999.

image

  • Click on “Add segment” to add a financial dimension
  • Select the financial dimension

image

  • Click to the filter to edit the field
  • Select “All values are allowed” if there is no restriction or enter a rule.
  • Select “Allows Blanks” if the filed is not mandatory (the user can let this filed blank when he posts a transaction).

image

  • Click on “Validate”
  • The first account structure AS1 is done.

image

Example 2: Create AS2 (Purchase accounts + Department + Cost center + Budget)

  • Click on “New” to create a new structure
  • Enter the account structure code and the description

image

  • Go to the Main account column and click to the filter.
  • Select “Specify which values are allowed”
  • Enter the rule : in my chart of account, purchases accounts are all accounts contained between 600000 and 689999 and accounts starting by 79.

image

  • Click on “Add segment” to add a financial dimension
  • Select the financial dimension.
  • For the AS2, I add a department, cost center and Budget dimension.
  • For the department, the option “Allows blank” is selected but not for the Cost center dimension.

image

  • Click on “Validate”
  • The second account structure AS2 is done.

image

Example 3: Create AS3 (P&L accounts + Department + Cost center)

In my chart of account, Profit and Loss accounts are all accounts contained between 600000 and 799999. But, the accounts between 600000 and 689999 and also the accounts starting with 79 are already in an account structure and they must be only in one account structure. And for this rules, I need to specify a range of specific cost center for all the 69  accounts.

  • Click on “New” to create a new structure
  • Enter the account structure code and the description

image

  • Go to the Main account column and click to the filter.
  • Select “Specify which values are allowed”
  • Create a first range of main account : accounts between 700000 and 789999.

image

    • Click on “Add segment” to add a financial dimension
    • Select the financial dimension.
    • For the AS3, I add a department and cost center dimension.

image

  • Create a second range of main account
  • Go to the main account column and click on “Add main account node”

image

    • Click to the filter.
    • Select “Specify which values are allowed”
    • Enter the rule for the 69 accounts

image

  • Go to column CostCenter,
  • Enter the rule for the 69 accounts : only cost center dimension starting with OU_35 are allowed.

image

  • Click on “Validate”
  • The second account structure AS3 is done.

image

3. Use account structures

  • To use an account structure, you need to active them.
  • Go to the congigure account structures form, select the account structure and click on “Activate”

image

  • Once your structures are activated, you can link them to the chart of account
  • Go to GL > Setup > Chart of accounts > Chart of accounts
  • Go to the account structures tab and add the account structures

image

If we go to the General ledger journal:

  • AS1: Balance account + Department

image

  • AS2: Purchase account + Department + Cost Center + Budget

image

  • AS3: P&L account + Department + Cost Center

image

  • AS3: Special rules for accounts “69” : only OU_35* are allowed

image