Difference between Transfer Journal and Transfer Order?

What is the difference between a transfer journal and a transfer order?
Transfer journal – The Inventory Manager transfers the items from one dimension (warehouse, location, color, etc) to another one instantaneously.transfer journal

Transfer order is used for registering in the system the items that must be moved from one warehouse to another and for managing this process.

Process Includes:
Create Transfer Order
Pick Items to Transfer->then->Picking list registration
or
Pick Items to Transfer(No Picking list registration)
Ship Transfer Order
Receive the Items at other end.

transfer order

Personalize Dynamics 365

With the release of Dynamics 365 you are now able to do a quick personalize Dynamics 365

We will personalize “Release product” form.

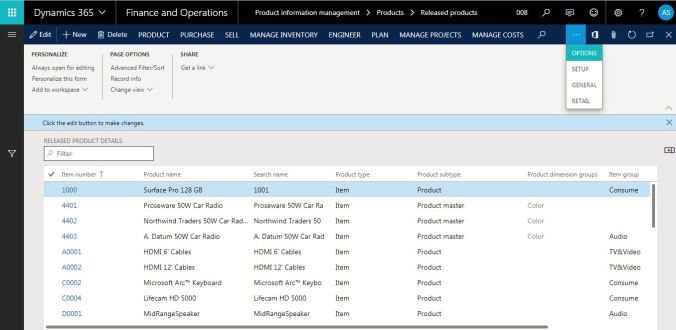
Follow path : Product information management > Products > Released products. click on “Option” button to Personalize release product form.

1

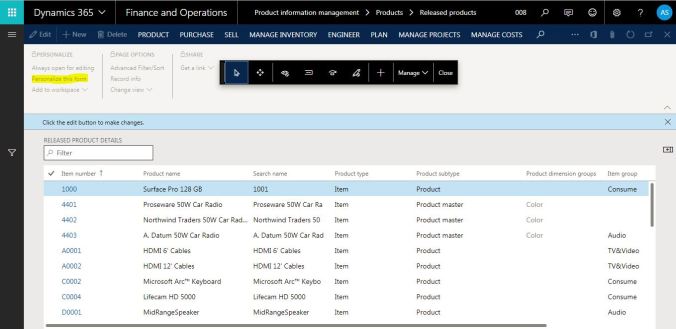
On below screen click on “Personalize this form” this will open small panel for personalize this form; which include move grid from one place to another, hide any field, add any field etc.

2

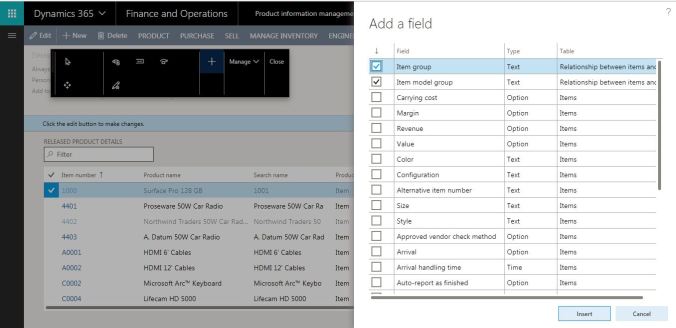
Click on “+” sign to add field in form. then click on any field, this will open one small window to add fields on selected form.

Select the check box to add field and click on “insert” button to add it. this will add field on selected form.

you can also export and import any personalization from “Manage” button.

3

Hope this will help you to personalize Dynamics 365


Try out Dynamics 365 for Operations now for free!

With the release of Dynamics 365 you are now able to do a quick demo of the client with a VERY limited set of functionality.

By going to: https://aka.ms/D365OperationTrials you will be able to get your very own company to play around with.

The experience of setting it up is remarkably simple.

d3fodemo0

Just add you email addresse in the registration box (Mine was in my native language). You do need to have an Office 365 subscription (or atleast an Azure tennant). Invite some collegues to join you in the demo experience (from your domain) and watch the magic happen.

D3FODemo1.png

Ready to explore

You will then be presented with an environment that is only accessable by you and the people you invited from your organization.

D3FODemo2.png

After the intro the system will send you directly to the scripted Task guide demos.

D3FODemo3.png

You can then click through any of the three scripted demos on your own to experience the Dynamics 365 for Operations web client.

If you want to roam around the application on your own, you can do so. There are however a very limited set of things you actually can do.

The access level is very restricted as you can see in the modules available.

d3fodemo4

It gets even more apparent when you look at the individual modules.

d3fodemo5

Not much to click on, but the full blooded version might be a bit daunting (as shown below) and this is maybe more close to the actual experience of a simple application user.

D3FODemo6-2.png

D3FODemo6.png

You cannot create a sales order,  but it is however possible to create a new purchase order.

D3FODemo7.png

So this is most definite NOT a feature demo, but a simple demo of the user experience which is pretty awesome. Contact your Dynamics Partner or Cloud Service Provider to get a full demo of the functionality.

Also check out the AppSource for more industry specific or scenario related application demo.

Setup and process for intercompany trade in Microsoft Dynamics AX 2012 R3


Dynamics AX 2012 R3 allows for the capability to handle intercompany trade transactions. Intercompany trade transactions allow organizations to sell products and services to other business units or legal entities within the organization for fulfillment of a customer order.

This blog will outline the setup and process of creating a sales order for an external customer with the help of intercompany trade process.

For example, we have an organization with two legal entities, GCCI and USMF. GCCI receives the order from a customer, but does not have inventory to fulfill order. Therefore, USMF will fulfill the order with their inventory and deliver directly to the customer on behalf of GCCI. For this to occur, GCCI will use the intercompany trade transactions process.

The first step is to create a vendor in GCCI in the USMF entity. A new vendor can be create by navigating to Accounts payable > Common > Vendors > All Vendors.

Next, let’s create a customer record in USMF for the GCCI intercompany customer. To create a new customer, navigate to Accounts receivable > Common > Customers > All Customers.

Once the customer record has been created, open the customer record and open the miscellaneous Fast Tab. Then check the create intercompany orders option.

Then go to the general tab in the action pane and select Intercompany.Dynamics AX 2012 R3 Intercompany Trade 3

Once in the intercompany menu, check Active to setup trading relationship. Under Purchase relation, select the vendor company and specify the intercompany vendor record created in GCCI.

In the purchase order policies tab, a set of options will be available for a user to select. These options dictate how the intercompany purchase orders and intercompany sales orders will behave. To fully understand the various options available for intercompany trade relation setup, refer to this TechNet article: Set up intercompany trade [AX 2012]. In this example, Post invoice automatically under Original sales order (direct delivery) and Post invoice automatically  under Intercompany purchase order (direct delivery) are checked.Dynamics AX 2012 R3 Intercompany Trade 4

In the sales order policies tab, the intercompany sales order tab lists options that dictate how the intercompany sales will function. In our example, the sales order numbering and customer payment journal is specifiedDynamics AX 2012 R3 Intercompany Trade 5

Once the trading relationship setup is completed, close the intercompany form and go to the GCCI company to begin creating the intercompany sales order. Keep in mind that after the intercompany trade setup is activated, the intercompany vendor account in GCCI will be automatically setup. To process an intercompany sales order, navigate in the GCCI entity to Accounts receivable > Common > Sales orders > All sales orders. Create new sales order and specify the customer for which the order will be fulfilled. Then proceed to fill the necessary information like item, quantity, site and warehouse, and etc. After the sales order is filled, select Header view in the action pane.Dynamics AX 2012 R3 Intercompany Trade 6

In the intercompany FastTab, check the Autocreate intercompany orders’ and Direct delivery options.Dynamics AX 2012 R3 Intercompany Trade 7

Then in the action pane, select Direct delivery. Specify the intercompany vendor account and then flag the Include flag. Then select OK.Dynamics AX 2012 R3 Intercompany Trade 8

An infolog will then appear indicating that a purchase order and an intercompany sales order have been created. Then close the sales order form.Dynamics AX 2012 R3 Intercompany Trade 9

Now the user will go to the USMF entity and navigate to Accounts receivable > Common > Sales orders > All sales orders. Locate the sales order that corresponds to the sales order created in GCCI. In this example, the intercompany sales order can be identified by number sequence.Dynamics AX 2012 R3 Intercompany Trade 10

Open the sales order and process the order as normal. At the end of the process, the sales order should show the status as Invoiced.Dynamics AX 2012 R3 Intercompany Trade 11

After successfully invoicing the sales order in USMF, go to the GCCI company and navigate to the intercompany purchase order. It can be noticed that the purchase order was invoiced automatically. Keep in mind that the status of the purchase order will appear as invoiced because we had set the option in the intercompany relation setup.Dynamics AX 2012 R3 Intercompany Trade 12

Navigating to the original sales order, you’ll notice that the status of that order will also show as Invoiced. Upon completion of the transaction, users can make and receive payments by using the AP and AR payment journals.Dynamics AX 2012 R3 Intercompany Trade 13


Import data with the DIEF

This article describes how to import data with the DIEF in Dynamics AX 2012

Step1: Import the file in the staging table

Access: Data Import Export Framework > Common > Processing group

  • Click “Get staging data”

dief001

  • Job ID is given by the system
  • Enter a description

image

  • Click “OK”
  • Click “Preview” to check if information are correct

image

  • Click “Run”
  • and “OK”

image

  • · Data are created in the staging table

image

Step2: Import data to the target

  • Click “Copy data to target”

dief002

  • Select Job ID used above
  • Click “OK”

image

  • Click “Run”

image

  • Click “OK”

image

  • · Records are created


Create a processing group for positions with the DIEF

This article describes how to create a processing group to import positions with the DIEF in Dynamics AX 2012

Position

Access: Human Resources > Common > Organization > Positions > Positions

I need to import:

  • Position
  • Description
  • Report to position
  • Assignment date

image

Note: The “Report to position” in the DIEF is created via the Relationship. That why you need to setup to fields with value Hierarchy name+Position Id

dief003

Setup the Processing group – Option CSV file

Access: Data Import Export Framework > Common > Processing group

  • Click “New” and enter a name and a description

image

  • Click “Entities”
  • Select Entity = Positions
  • Format = CSV
  • Select the two options

image

  • Click “Generate source file”: the wizard form is open
  • Click “Next”
  • Select the fields below
    • Position = Position Id
    • Description = Description
    • Report to position = HcmPositionHierechy_ParentPositionId and HcmPositionHiearchyType_Name
    • Assignment date = HcmPositionDuration_ValidFrom

image


  • Click “Generate sample file”

A csv file is open and contains all the fields selected above

image

  • Click “Finish”


  • Complete the file with all the positions you want to import and add the path to the processing group.

image

  • Click “Generate source mapping”

image

  • Click “Validate”

The processing group is now created and can be use to import data.

Remark: If the report to position refer to positions include in the same file, you will need to import twice the file:

  • First round to create all positions
  • Second round to assign the report to position

Dynamics Excel Add-In

This article presents an example of the Excel Add In utility in Dynamics AX 2012

Step 1: Identify the table in Dynamics AX

  • Open the table you want to use in Excel Add In
  • Right click > Personalize

image

  • Note the table name

image

Step 2: Import the table in Excel

  • Open Excel and go to the Dynamics AX tab
  • Click “Connexion”
  • Select the company

image

  • Click “Add data”
  • Select “Add table”

image

  • Retreive the table and add it to the Selected table area

image

  • Select option “Create worksheets”
  • Click “OK”

image

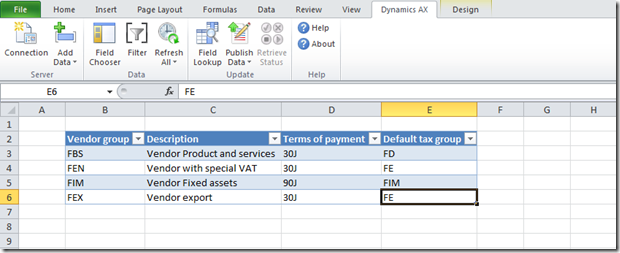
  • Table is open in Excel:
  • Key fields are automatically selected

image


  • Add column:
  • Double click to add a column

image

Step 3: Refresh the data of the table

  • Close the “Field Chooser” bar
  • Click inside the table
  • Click “Refresh  All” > “Refresh Current”

image

  • All the data from Dynamics AX are loaded in the Excel file

image

Step 4: Update or create a new record

You can now update the data:

  • for example the description

image

And load the updated data into Dynamics Ax

  • Click “Publish” > “Publish selected” to publish only the current worksheet

image

  • Once the data are published, a new sheet is created with the details of the import status

image

  • Check in Dynamics AX: the table has been updated

image

Or you can add a new record:

  • Create a new line in the excel table
  • Populate all the fields

image

  • Click “Publish all”

Remark: If there is an error (a code does not exist for example), the error will be describe in the status report and the record is not imported.

  • Check in Dynamics AX: new record has been created

image